Unique Grip Equipment
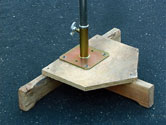
No Trip base
When we ran out of C-stands we considered what would be the ultimate stand for our tight spaces: A stand that would get closer to a wall or against a curtain seperating different sets and avoiding a leg sticking out under the curtain to trip over. The No-Trip Stand evolved. Acturally it was only a base. We used Seno's, of Modern Studio Equipment, Spider Base Risers and Junior Nail-on Plates. Our no-trip base is 2 ea., 2" x 4"s in a tee configuration with clearance between the ends so that only the ends of the 2 x 4's touch the floor. They have 3/4 plywood on top where the Junior Nail-on plates are screwed down where the 2" x 4"s join.
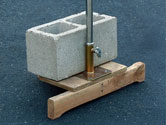
Concrette block with clamp and Baby Plate
Running short of sand bags after using twenty from Seno, and a bunch that I had, we started using 8" x 8" x 16" concrete blocks on the camera stands and our no-trip grip stand bases. The blocks became apple boxes and seats at times. They are rough on the hands and we got a stone to smooth the edges, but no one ever got around to it. A thick coat of paint would help too. We also used the bricks for 4 and 8 inch high light stands by clamping baby plate to them. A low stand and sand bag all in one.

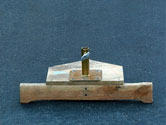
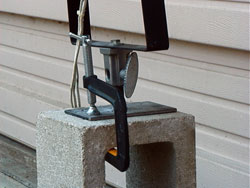
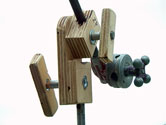
Ron's rig from the Davey & Goliath show
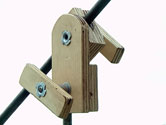
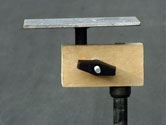
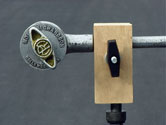
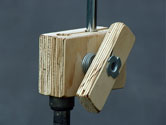
We found at Harborfreight.com some Multipositional Magnetic Bases for dial indicators. $12.99 regular and $6.49 on sale. (05646-2CUB) These became our mini-grip system. We expanded them with longer 8 and 10 mm drill rod to make a great small scale grip system to mount lights, cutters, rigs, puppets etc. We used the included magnetic bases for brakes on the traveling table rig. The bases would make a great magnetic rake for picking up nails and drywall screws. They can be assembled mix and match in various ways to make different rigs.
You have to be careful to not use a rods that are very much smaller that the supplied rods or 8 and 10 mm rods because the squeeze clamps will keep the smaller shape. They can be bent back out to size, but you have to be careful to keep them working smoothly. The 8 and 10 mm rods are available from Mc Master-Carr. 5/16" and 3/8" are too small, but if you used them only and not the metric rods you might be OK. The end clamps will take 1/4" rods and bolts.
You can make miniature 10 mm baby plates to clamp or screw to sets out of metal or plywood. I cut some of the 10 mm base rods to attach to plywood and tapped the cut off ends to attach to 3" square metal plates.
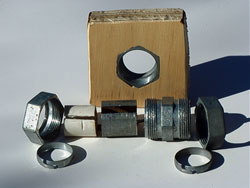
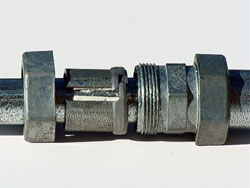
Telescoping Conduit
For years I dreamed about finding a telescoping EMT conduit COUPLER. On this job we found a solution. Cut a 1" length of 3/4" conduit with a tubing cutter that leaves a lip on the inside of the conduit. Cut it length lengthwise to allow it to be compressed by the coupling nut of a 3/4" x 3/4" compression (not set screw) coupler. Cut some 1/2" PVC thin wall pipe to fit inside the 1" long 3/4" conduit piece that you cut. Also cut the PVC pipe lengthwise. See if 1/2" conduit will now slip inside the coupling. If not you have to turn on a lathe a little PVC away from some 1/2" PVC pipe (before cutting) or reaming it with an expansion reamer to about a .710 inside diameter. Cut the PVC as before lengthwise. Clamp the expansion coupler on to the lower 3/4 pipe and tighten the upper one as needed to hold the 1/2" conduit inside. We made 2" x 2" knobs out of 3/4" plywood for the upper clamping nut by drilling a hole that the nut could be pressed into. You can use the same method for 1" with 3/4" conduit inside. If you get all the parts in front of you this will make better sense.
To make conduit grip and light stands we cast 3/4" and 1" conduit in 1 gal. paint cans like the full size grip eliminators.
To make grip heads for both 5/8" baby and 1/2" conduit (.710"OD) we drilled high quality 3/4" plywood with 5/8" holes into 3" square pairs of blocks. When drilling we spaced the blocks with thin cardboard to get a tight fitting clamparound the 5/8" grip arms, grip or light stands. To drill holes for 1/2" conduit you can sand down a 3/4" paddle (chipper) bit to .710" being very careful to not sand down the cutting tip smaller than the rest of the bit. The diameter away from the tip has be smaller. Do this with a drill press and hand belt sander. Keep it cool to maintain the drill's temper. You could probably do it with a hand drill and a belt sander. Make sure the paddle bit and sander go in opposite directions. Make test holes often before sanding off too much metal and making it too small. I have turned down Forstenere bits too, but it is not easy. You could make a whole grip and light stand system with this stuff if you couldn't afford anything better.

Work Light Adaptation
You can also make 5/8" baby pin or 1/2" conduit adapters for your hardware store work light. .
A conduit bender (hickey) is useful when working with conduit to get different angle bends without pinching the tube. There are also right angle pull through corners that can make smaller rag frames. We used a lot of conduit in our overhead grid to hold the black curtain dividers.
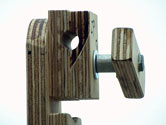
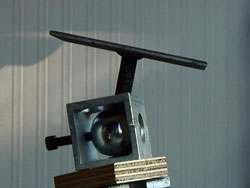
Ball Joints from Metal and Wood
We had many various size pieces of snow covered mountain pieces that with differeent size of trees made possible wide vistas with perspective. To adjust set pieces at various, angles we needed to suppliment all the ball heads that I already had. I took a 2" trailer ball and had it welded to a baby type plate. I drilled a 2" hole in some 2" ID square 1/4" wall tube. A 1-1/2" hole received the ball pushed by a 3/8"-16 cap screw. Other 3/8"-16 holes were drilled and tapped for mounting.
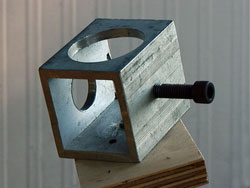
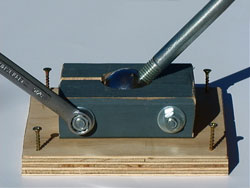
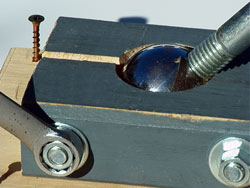
Wood ball head
A newer version used a 1-7/8" trailor ball in a 1-7/8" hole in hard wood that was screwed into a piece of plywood for screwing to the set piece. Squeezing the hardwood captured the ball. This has great use in the future. Fitting the wood socket on the set pieces and the ball on a stand is much easier than using a grip stand and grip head. For a big budget show you could use 3 ton hydrolic jacks as stands that would adjust from 26" to 26" + 23."
Getting lower than the 20" grip stands and being adjustable in height is a problem. One solution for really low stands might be low profile grip eliminators. Maybe 2" x 4"s with concrete in between the legs. ?
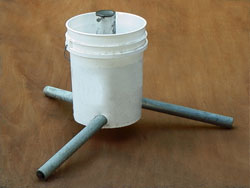
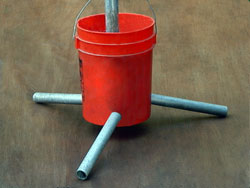
Grip Eliminator
We made and used "grip eliminators" a lot. They were very useful for securily holding set pieces and heavy iitems at strange angles. They held our 3' x 4' mirrors, rigs and whatever things that a grip stand was too light to support very well. They were solid supports for wild small set pieces that the animators could animate puppets on.
The Grip Eliminator got it's name as a successor to the grip stand and the fact that it weighs enough to eliminate weaker grips. They are great for mounting props, rigs, and even cameras so they won't move. Speed Rail© is used instead of regular grip stand hardware. They are basically 5 gal. paint buckets full of concrete with 3 legs and a vertical pipe riser through the middle. Our standard model has 3 ea. 2' long 1-1/4" steel water pipes for legs. Drill 3 ea. 1-5/8" holes in the sides at the bottom of the bucket at 0, 120 and 240 degrees. These are for the legs. I like a riser that passes through a sleeve through the bottom of the bucket to allow more adjustment and the changing of length of a riser.
This sleve can be 2 inch 1/8" wall TUBE for 1-1/4" inch PIPE. Or the sleeve can be 2-1/2 inch PVC pipe for 2" schedule 40 pipe. (See Pipe and Tube in Rigging.) Making the tightening screws gets a bit tricky. If you use metal sleeves, you can drill and tap them. If you use PVC you have to provide more grip for the tightening bolts. You can cast some stainless steel all thread in the concrete with greased coupling nuts in the middle. But keeping the cement from sticking to your all thread is tricky. You can coat the all thread between the coupling nuts with grease and then cover the threads with loose shrink tube or anything to keep the concrete from sticking. Make sure that there is plenty of surface for the coupling nuts to bond to the concrete.
The sleeve needs a tight hole through the bottom of the bucket to keep the concrete in. A hole saw or fly cutter can cut a tight hole. If you use a riser without a sleeve it can rest the riser on the bottom of the bucket. When pouring concrete rest the bucket on couple of 2 x 4s to keep it off the ground. Arrange the legs inside the bucket around the riser. Plug or tape the legs and riser so concrete won't flow out. Hold the riser vertical with grip stands or something else. Mix your concrete and fill the bucket 2/3 or 3/4 full. As the concrete sets carefully turn your all thread so it doesn't stick to the concrete. Let the concrete set well before moving or using. There are quick setting additives for cement.
When not in use they can be stored outside.
© Copyright 2004 Ron Dexter. All Rights Reserved.